

After installing Windows Server by using this method (Quick Install Windows Server with Windows Template), it's time to install heavy windows application such as a game server. 😁
Introduction
If you don't know RF Online before, it's an old 3D MMORPG game developed in 2004 (https://en.wikipedia.org/wiki/RF_Online), and soon as the server files got leaked, everyone can install their private server and become a gamemaster.

I used to be just a regular game player in junior high school till college, but since I understand how linux and windows server work, and I have a super-cheap-and-reliable-server from HostHatch. I'd love to deploy this on my server. 🤩
Specification
| Minimum Server Hardware & Software Requirement | My Server (HostHatch Sydney, AU) - IP : 103.123.123.123 |
|---|---|
| CPU : 2 core high clock speed (3.0ghz+) | CPU : 3 core (100% dedicated, burstable up to 300%) |
| RAM : 8 GB | RAM : 16 GB |
| OS : Windows Server 2012 R2/2016 or Windows 8 or Windows 10 | OS : Windows Server 2016 |
| Database : Microsoft SQL Server 2008 | ✅ |
| WinRAR/WinZIP/7z and Notepad | ✅ |
Installation
Getting Started
To be technical, the game files are based on RF Online 2.2.3.2. The files have been improved and optimized by RF-DEV team.
RF-Dev 2.2.3.2 Server
Download : https://mega.nz/file/3ZsEVZoJ#mr7uMjmznjudQhETJICePaUsBFrbNxhDAwBNfxRVLSc
Size: 242391498 bytes (231 MB)
SHA-1: A15099A44D0EFFF267EFF502BBC13EA163B194D2
RF-Dev 2.2.3.2 Client
Download : https://mega.nz/file/fdlUEL7A#RV6WnitsU639QqJx6Lq0p7LQOnh4rcNL-OQd7_e1-9k
Size: 1224451822 bytes (1.13 GB)
SHA-1:  C14311154FD18B92A71087DD773FE319D1B6FB55
Extract rfdev-2232-server.7z to your server meanwhile rfdev-2232-client .7z on your local PC / Laptop.
Install Dependencies
This application will install dependencies required by RF on your machine.
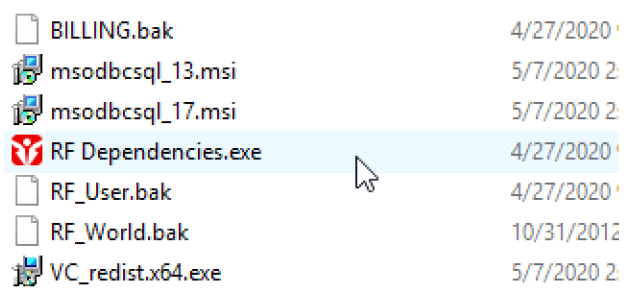
Run C:\rf\server\install\RF Dependencies.exe
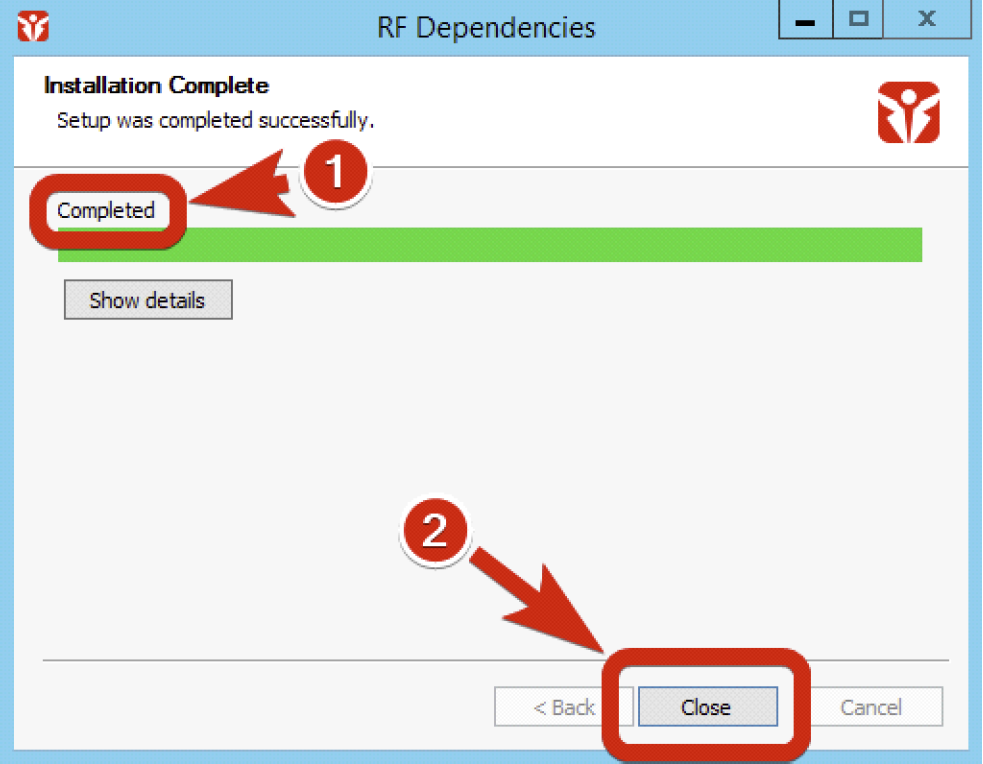
Click Install.
Wait for installation to complete, then click Close.
SQL Server Requirements
We need to install a special ODBC driver for RF to work on modern operating systems.
Run the following installers based on your operating system:
C:\rf\server\install\msodbcsql_17.msi
You now have all requirements installed. Proceed to Install Microsoft SQL Server (MSSQL).
Install Microsoft SQL Server (MSSQL)
This guide assumes you are installing SQL Server on a fresh operating system. The installation steps will be the same with all 2008 versions. Newer versions of SQL Server will have additional options but the general steps will be the same.
Visit Microsoft's website to Download Microsoft SQL Server 2008 R2 SP2.
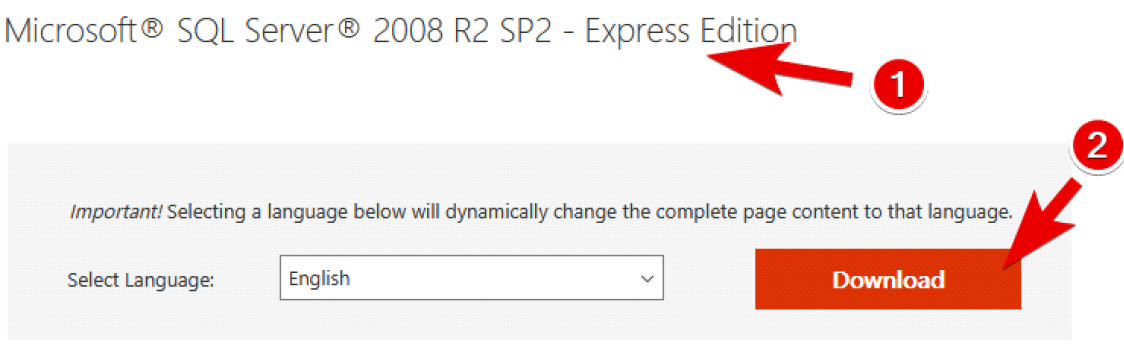
Select SQLEXPRWT_x64_ENU.exe, then click Next. The download will start immediately.
Run SQLEXPRWT_x64_ENU.exe from your Downloads folder to extract and run the installer. The installer will run automatically after extraction. Proceed to the next section.
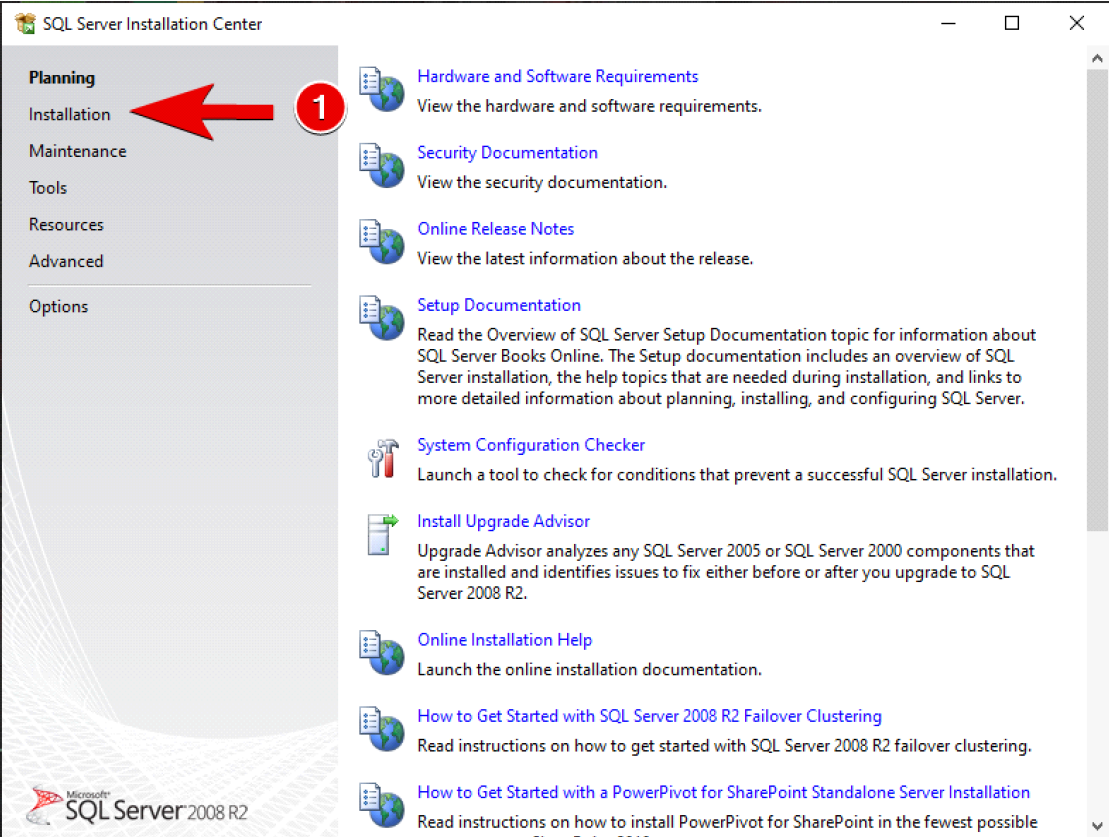
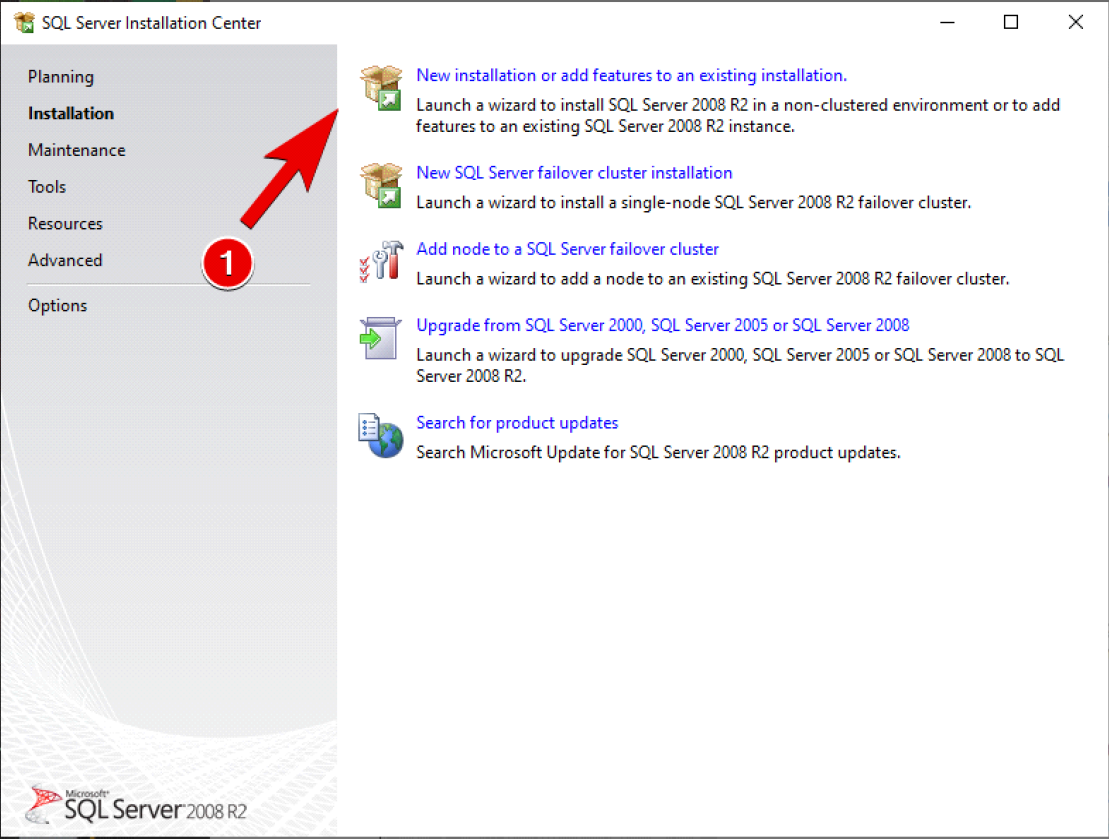
MSSQL Installation Wizard
Click Installation on the sidebar.
Select the option for New Installation
Click OK after the tests are completed.
Ignore the Product Key information and just click Next.
Check the box for accepting the License Terms, then click Next
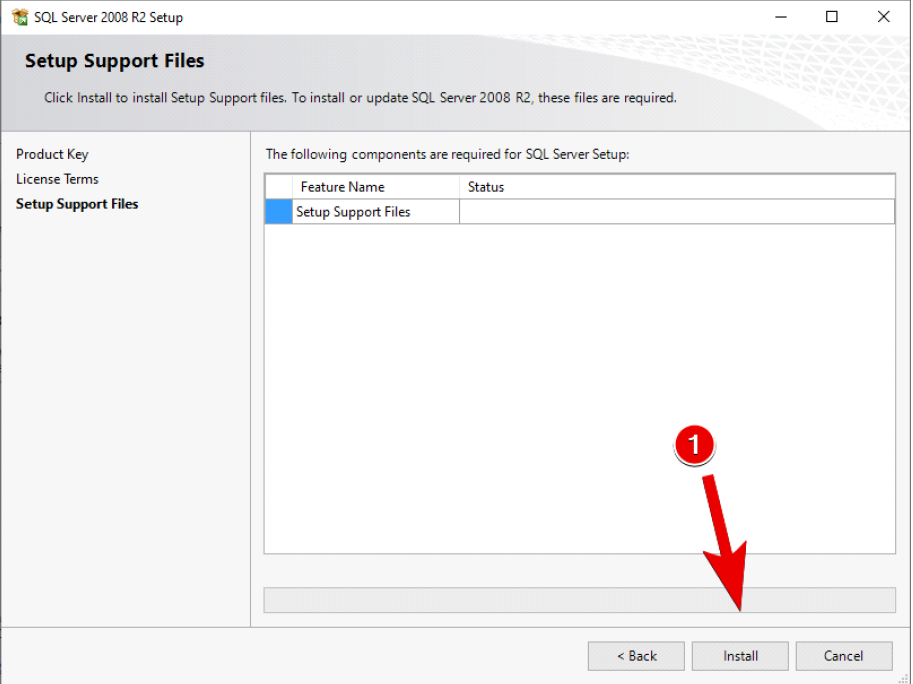
Click Install to install the setup files.
Click Next
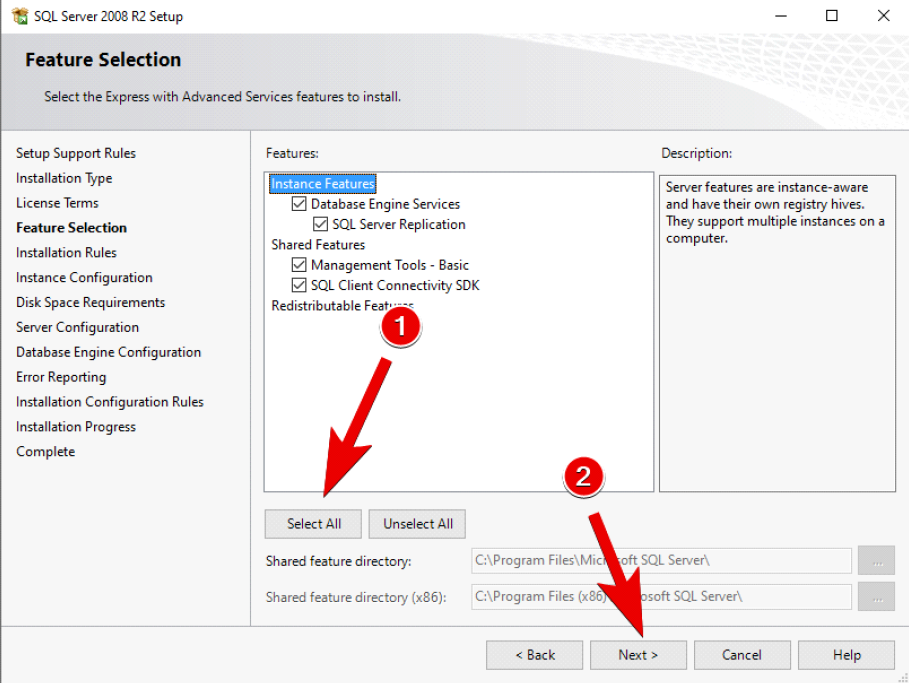
Select SQL Server Feature Installation, then click Next.
Make sure All Features are selected, then click Next.
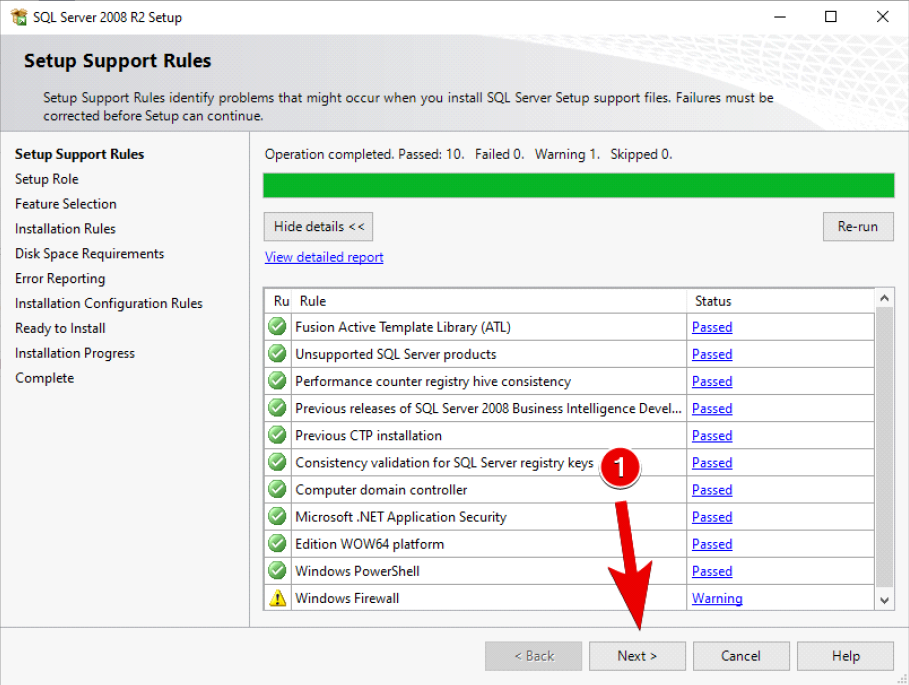
Allow Installation Rules to process, then click Next.
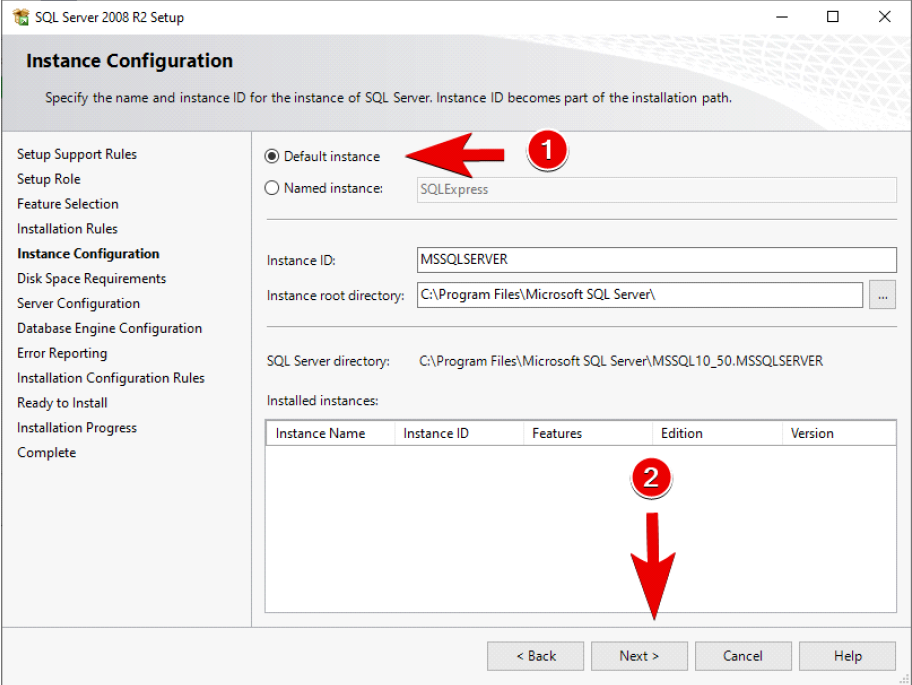
Select Default Instance, then click Next.
Don't skip this step. Not setting SQL Server to use the default instance will result in the Server not finding the Databases.
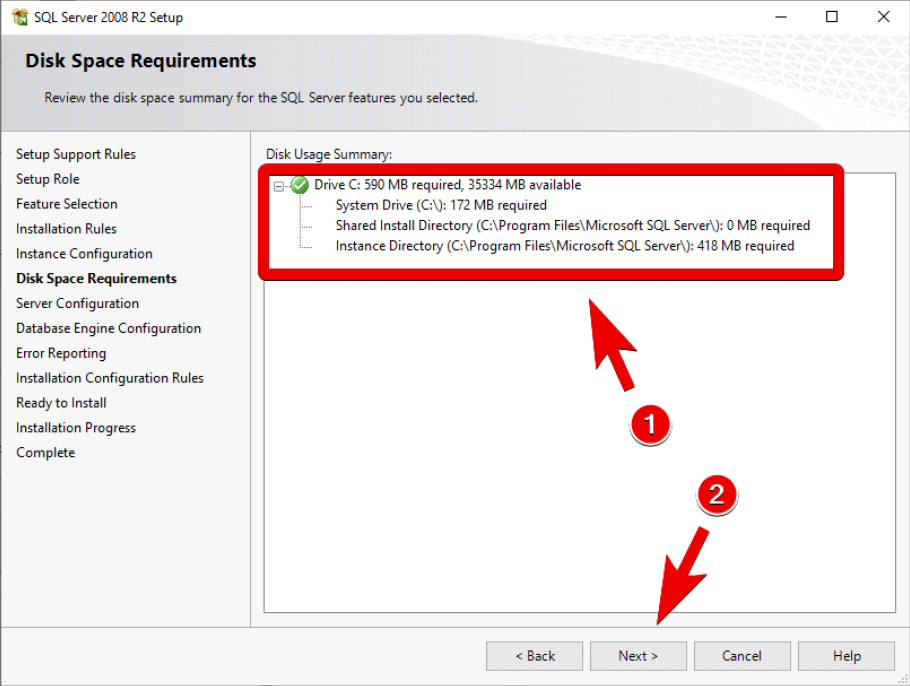
Verify disk checks pass, then click Next
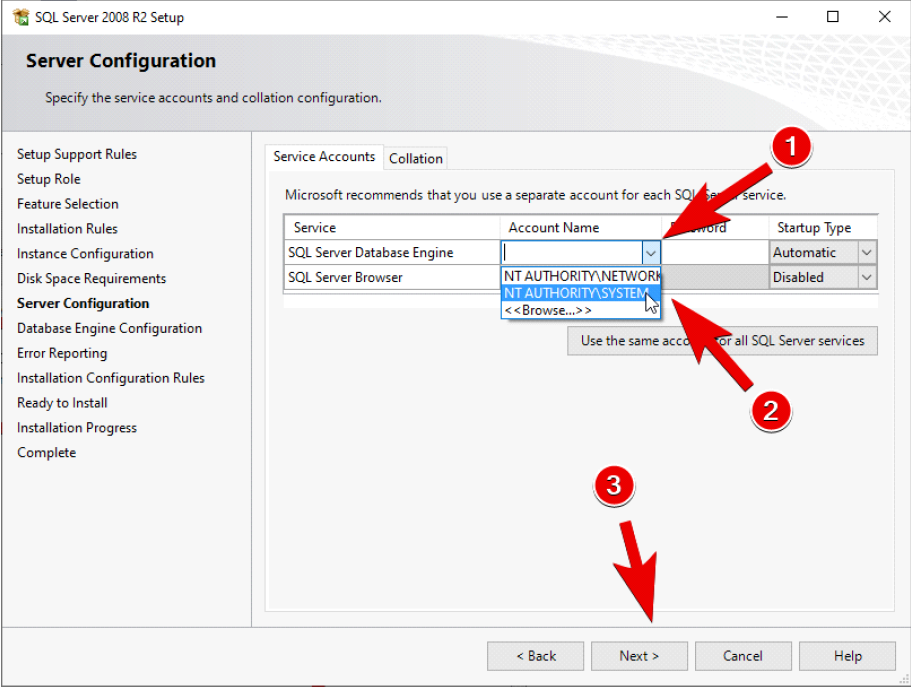
Select NT AUTHORITY\SYSTEM for the Account Name on SQL Server Database Engine, then click Next
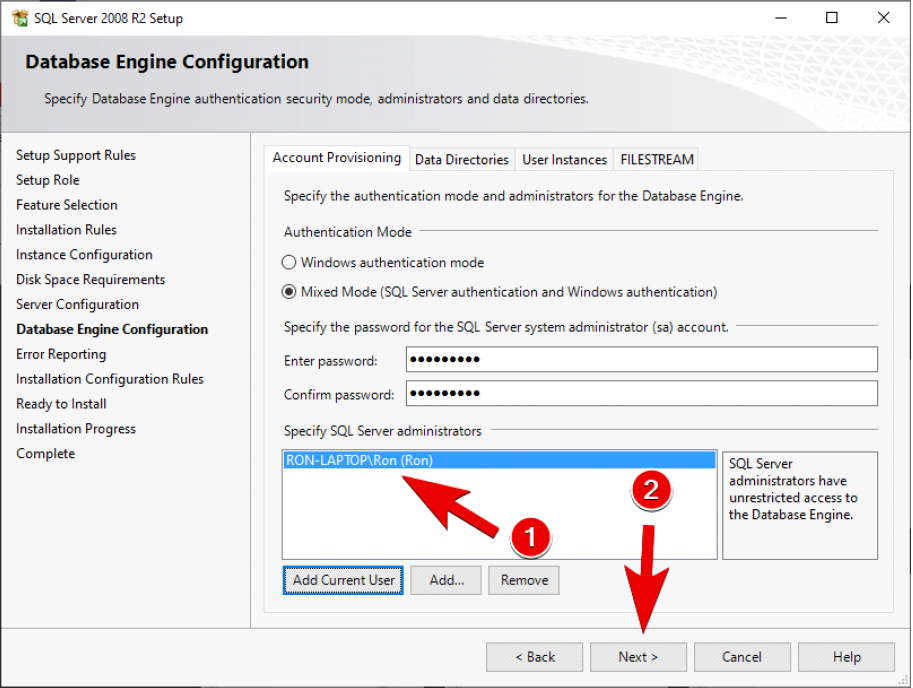
Under Authentication Mode, select Mixed Mode and enter a secure default password. After, click Add Current User and allow the installer a few moments to load

Verify your user is added, then click Next.
Click Next to skip through the Error Reporting information
Click Next through the Installation Rules
Review the summary as needed, then click Install
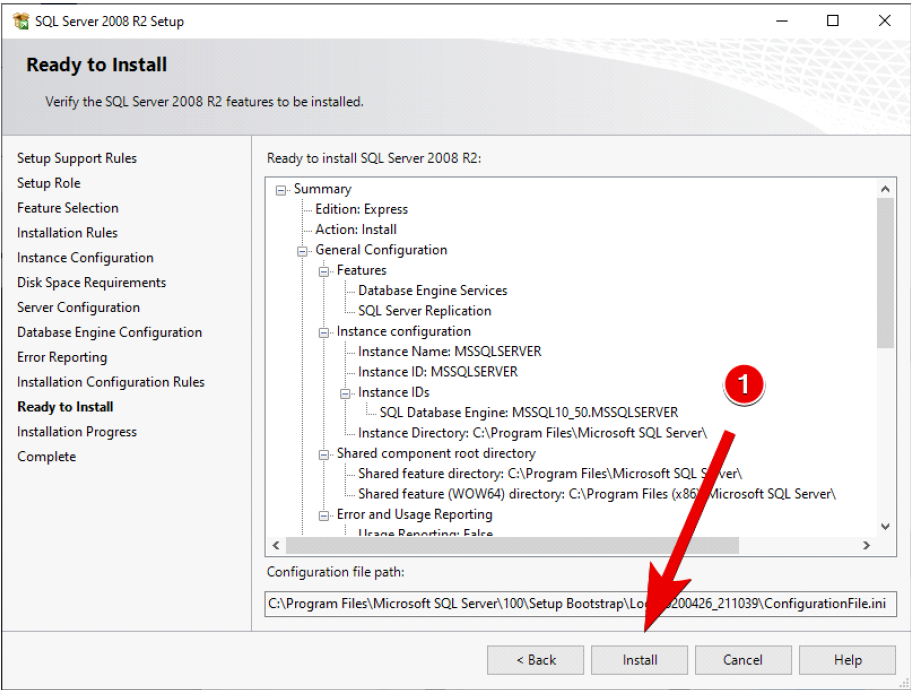
Allow some time for the installer to run. This usually takes around five to ten minutes.
Click Close once completed and Close the Setup Wizard.
Windows 7 Additional Configuration
If you are on Windows 7, some additional configuration is required. TCP/IP in SQL Server is not enabled by default on Windows 7 like it is on Windows 10 and most Windows Server editions. Not enabling TCP/IP causes a zone server connection bug when you try to log in to the game.
Fix this issue as follows:
Search for and open SQL Server Configuration Manager
Locate SQL Server Network Configuration -> Protocols for MSSQL Server, right-click TCP/IP, then select Properties
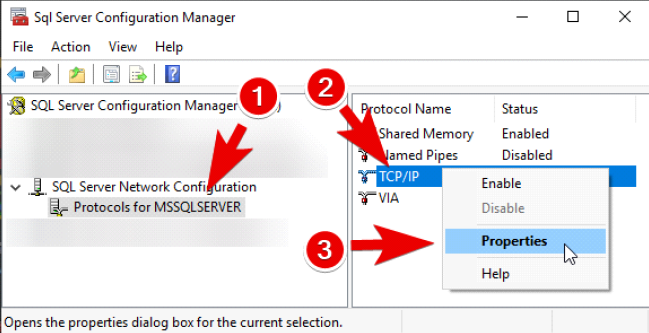
Click on the IP Addresses tab.

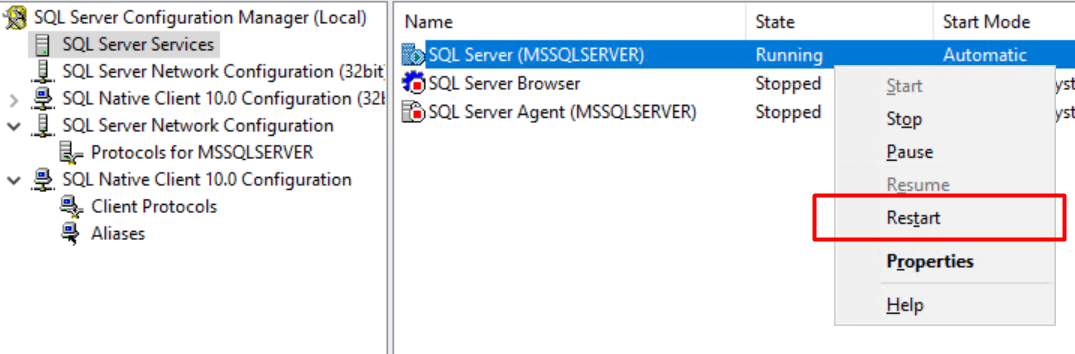
Verify your settings, then click OK. You will see a warning dialog box advising a restart. Click OK again.
Restart MSSQLSERVER process. Allow a moment for MSSQL to restart.
Now, let’s confirm we can connect to MSSQL.
Find and run SQL Server Management Studio. Connect to localhost with Windows Authentication
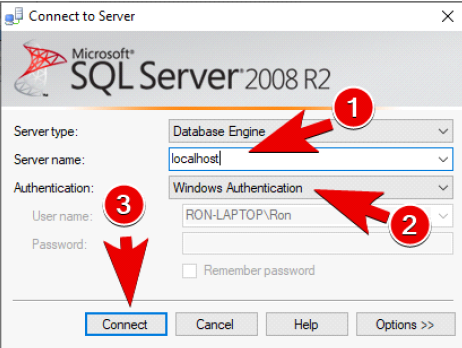
You should now be connected to MSSQL through Server Management Studio.
Install Game Databases
Ensure you have MSSQL installed before proceeding.
Check on install folder, and install msodbcsql_17.msi to use ODBC Driver 17 for all Windows Server and Windows 8 up, except if you are on Windows 7 be sure to install msodbcsql_13.msi to use ODBC Driver 13 instead.
Create Databases
We are now going to create new databases to store our game data. Open Microsoft SQL Server Management Studio, and login.
Right-click the Databases folder, then click New Database
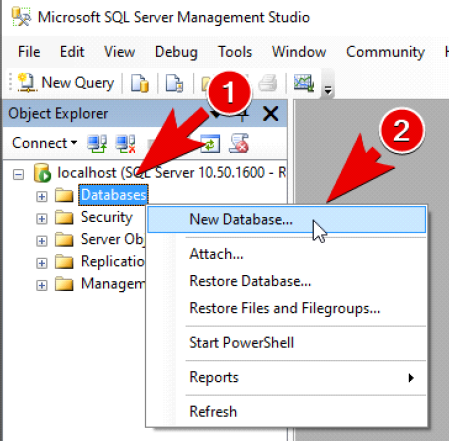
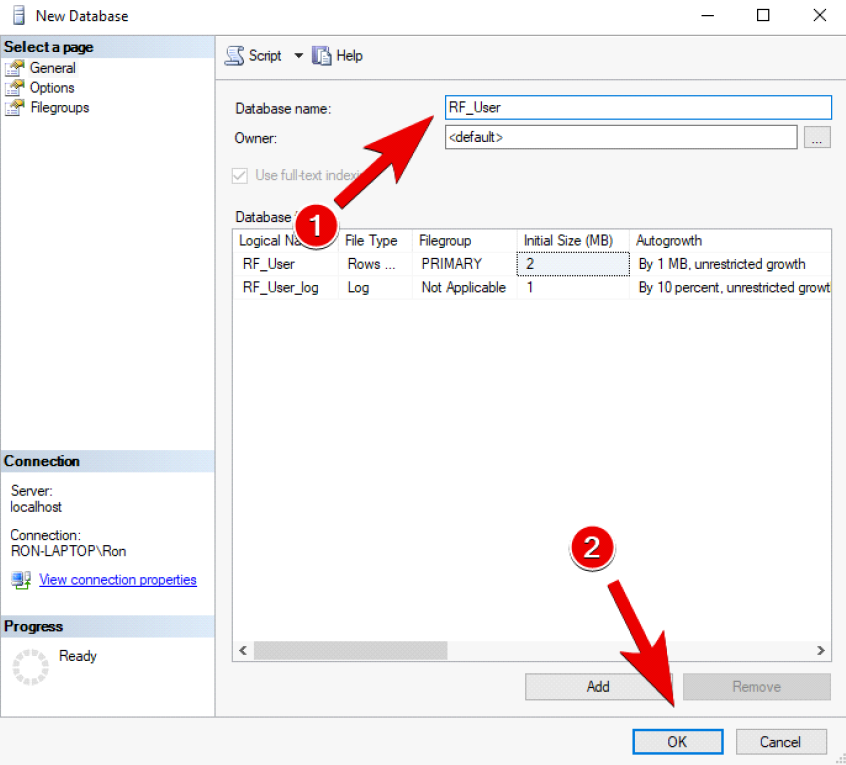
Enter RF_User into the Database name field, then click OK
Expand the Databases folder, and you should now see the RF_User database.
Repeat steps to create the following additional databases: RF_World and BILLING
Restore Databases
Next, we are restoring the clean RF database content into our new databases.
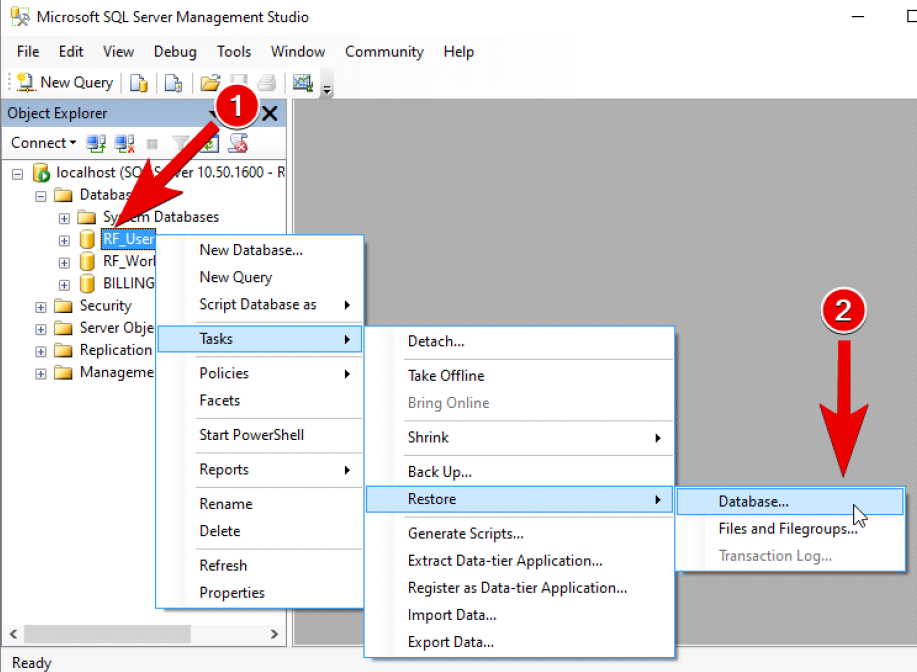
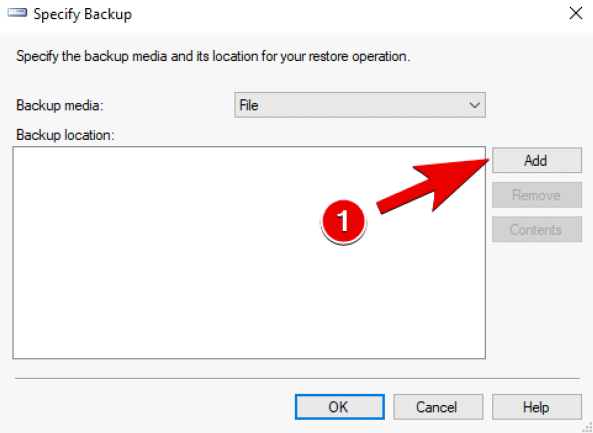
Right-click RF_User, then navigate to Tasks →Restore →Database…
Select From device, then select the browse (…) button
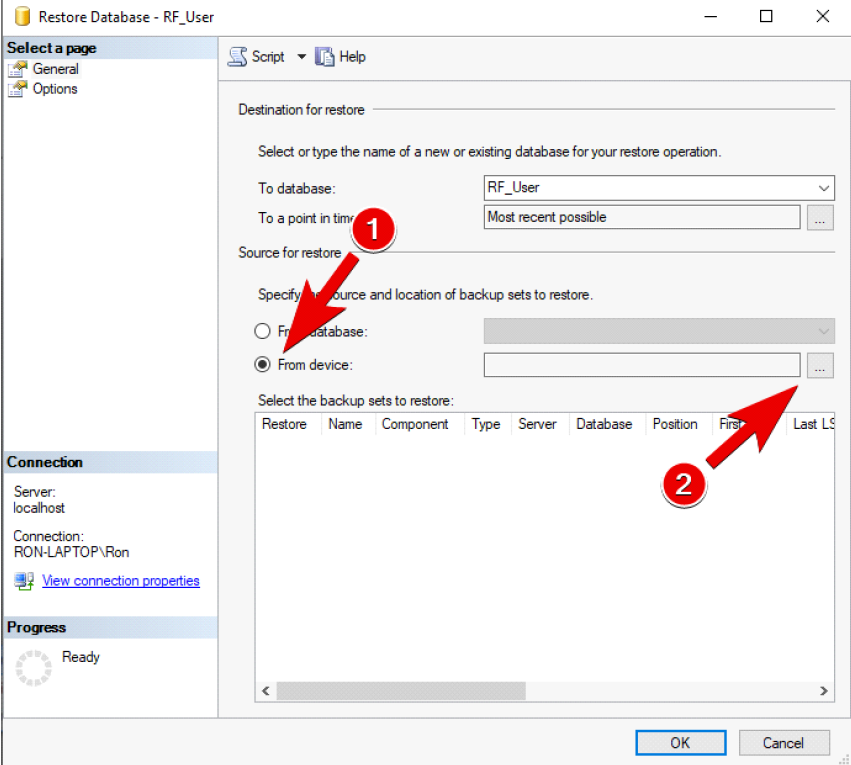
Click Add on the new dialog
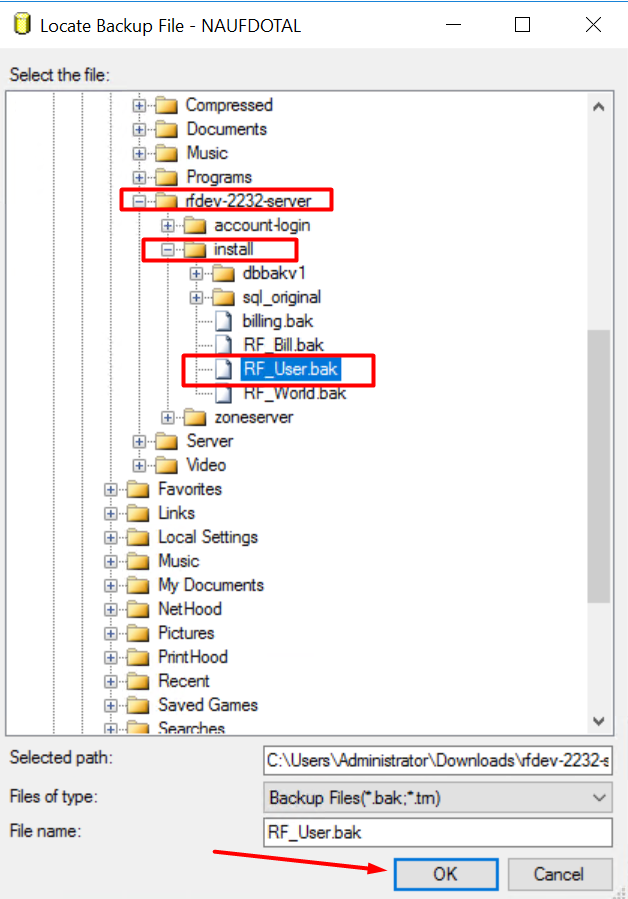
Browse to the databases folder, then select RF_User.bak and click OK
Click OK again, and Check the box under Restore, then click Options
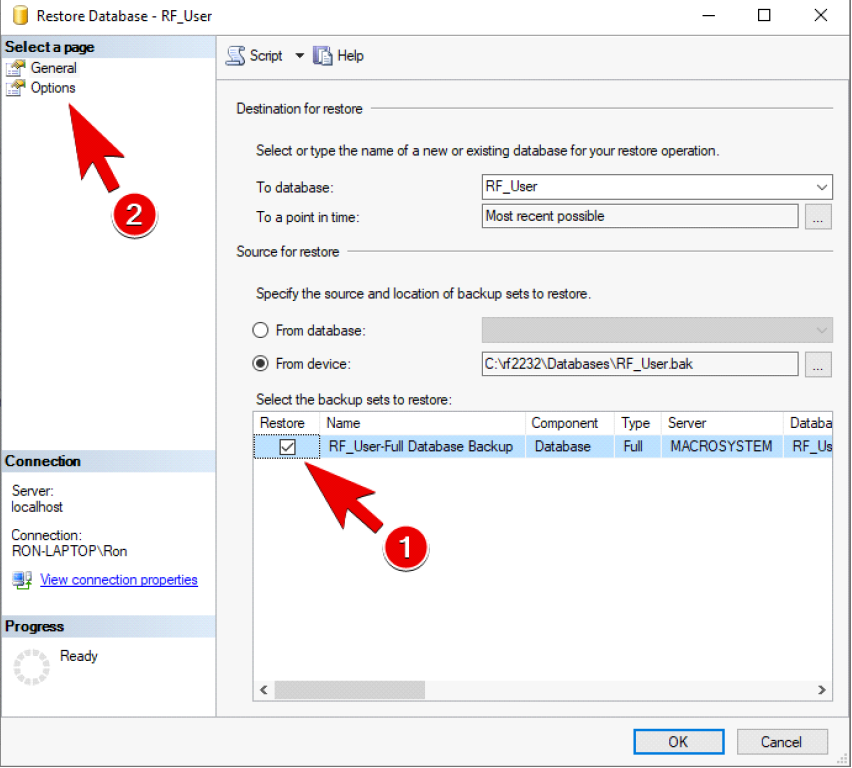
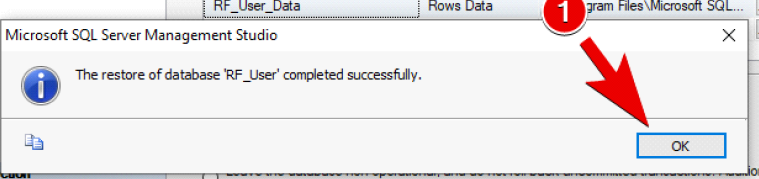
Check the box for Overwrite the existing database (WITH REPLACE), then click OK.
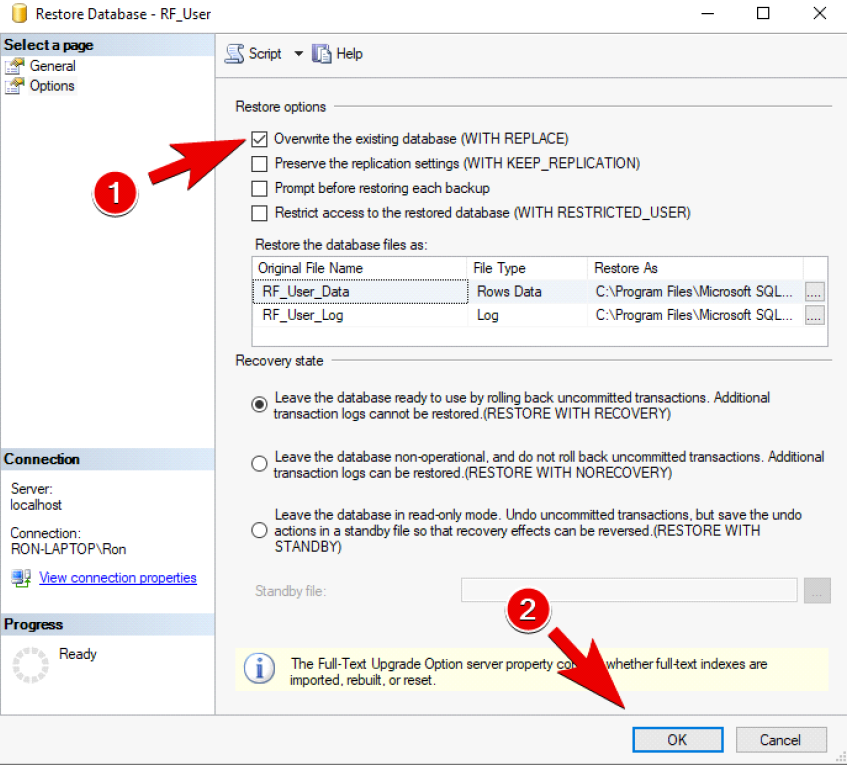
Click OK on the success message.
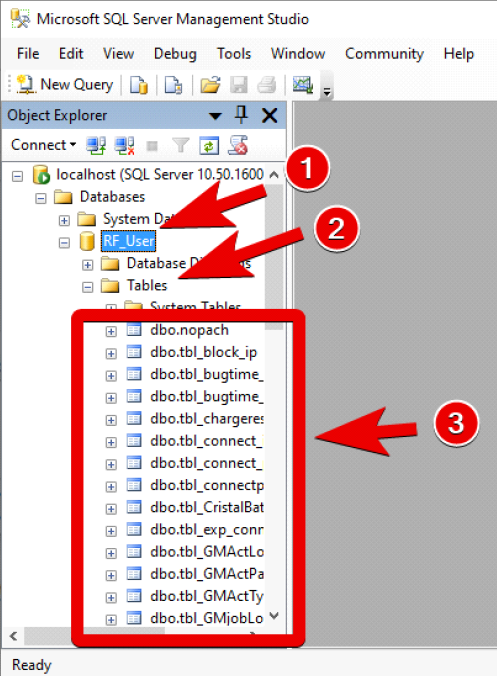
Expand RF_User →Databases and observe the tables. Your database now has content from the clean backup
Repeat steps to restore the following additional databases:
- RF_World
- BILLING
Configure ODBC
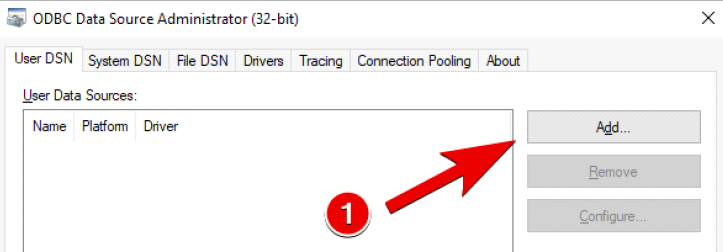
Finalize your database connectivity by configuring your ODBC settings. ODBC allows applications to connect to your Microsoft SQL server through various connection drivers.
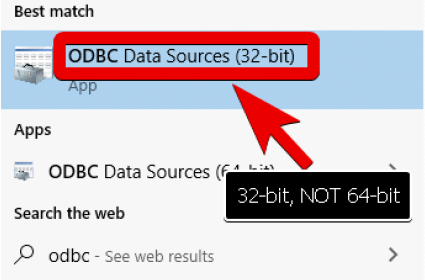
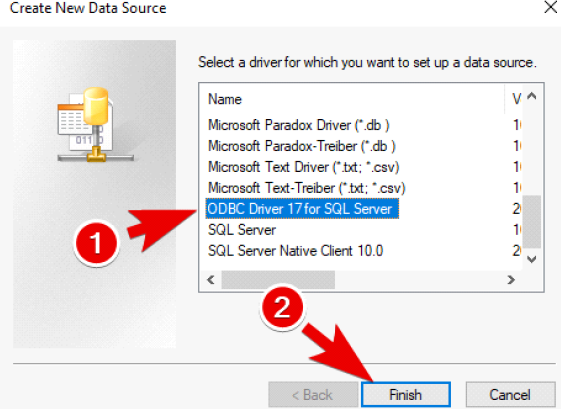
Open ODBC Data Sources (32-bit)
Click Add to add a new ODBC connection.
Select ODBC Driver 17 for SQL Server for the driver. If you are using Windows 7 select ODBC Driver 13 for SQL Server. Then click Finish.
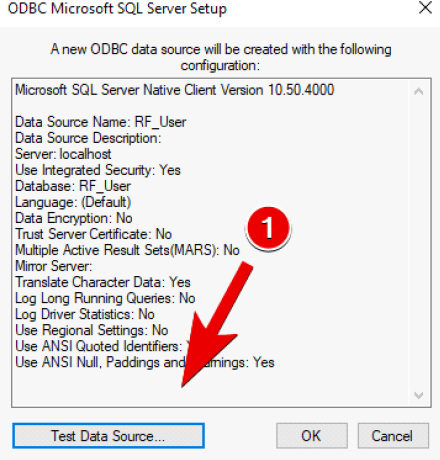
Enter RF_User for the Name, localhost for the Server, then click Next.
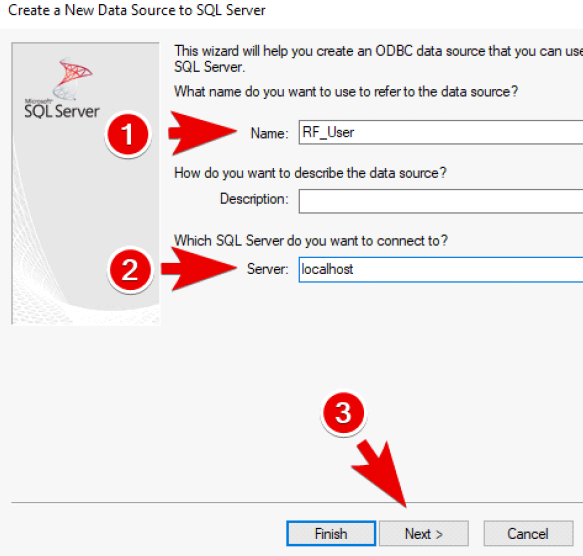
Leave Windows NT Authentication selected, then click Next.
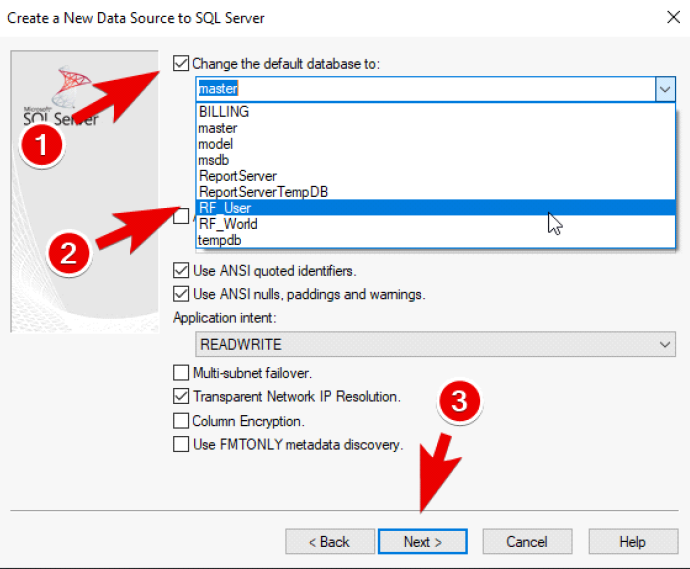
Select to use a Default database with the connection, select the RF_User database, then click Next
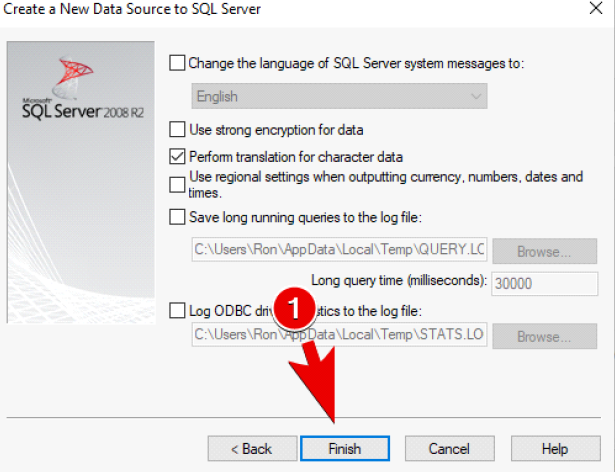
Click Finish.
Test the new datasource. You should see a success message.
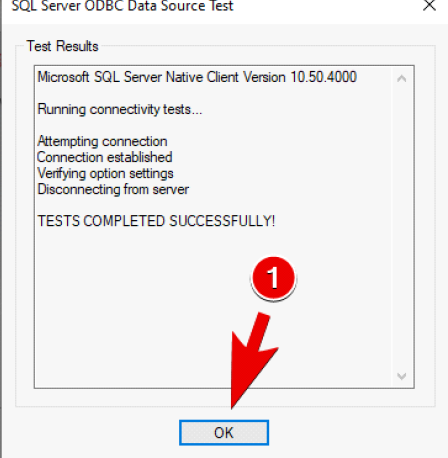
You will now see the RF_User datasource listed.
Repeat steps to add the following extra data sources in addition to RF_User:
- RF_World
- BILLING
Account Creation
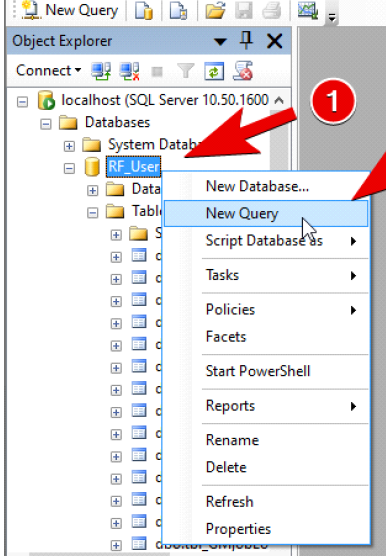
Creating game accounts requires running queries against your user database. Queries allow you to insert, modify, and delete game data in the database. Here is how to work with them.
WARNING: Always use caution when running database queries. Queries make immediate changes to your databases and are not always easily reversible.
Right-click the desired database, then click New Query
Modify your query using the text editor, then click Execute
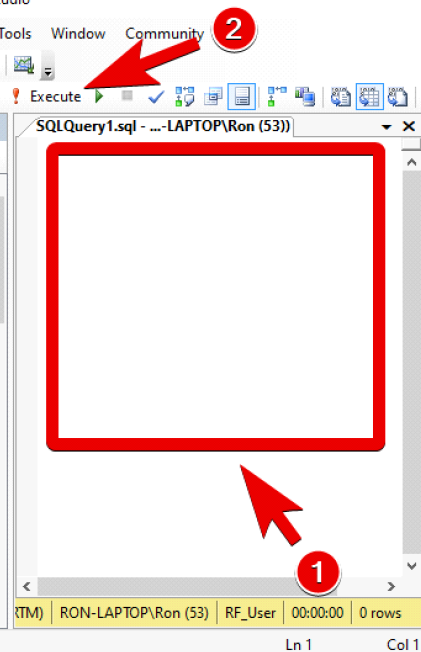
You will see a successful response if your query was successful.
Creating Accounts:: Player
Create a player account named user1 with a password of user1.
--RF_User
--Version: RF-Dev Game Files

INSERT INTO dbo.tbl_RFTestAccount
(id, password, BCodeTU)
VALUES
(CONVERT(binary, 'test1'), CONVERT(binary, 'test1'), 0);
Creating Accounts:: GameMaster
Create a GM account named !test1 with a password of test1 using the following query. Additional steps are required after the query and before you can log in.
If your GM account name is not on the Login_Filter_Dev.ini you won't be able to use all the GM commands! Check below how to do this.
--RF_User
--Version: RF-Dev Game Files
DECLARE @RC int
DECLARE @id varchar(13)
DECLARE @pw varchar(13)
DECLARE @depart varchar(32)
DECLARE @class varchar(12)
DECLARE @name varchar(12)
DECLARE @birthday varchar(10)
DECLARE @grade int
DECLARE @subgrade int
SELECT @id = '!test1'
SELECT @pw = 'test1'
SELECT @depart = 'none'
SELECT @class = 'GM'
SELECT @name = 'name'
SELECT @birthday = 'None'
SELECT @grade = 2
SELECT @subgrade = 2
EXEC @RC = [rf_user].[dbo].[pInsert_Staff] @id, @pw, @depart, @class, @name, @birthday, @grade, @subgrade
DECLARE @PrnLine nvarchar(4000)
PRINT 'Stored Procedure: rf_user.dbo.pInsert_Staff'
SELECT @PrnLine = ' Return Code = ' + CONVERT(nvarchar, @RC)
Once the query is run, edit table tbl_StaffAccount on RF_User database
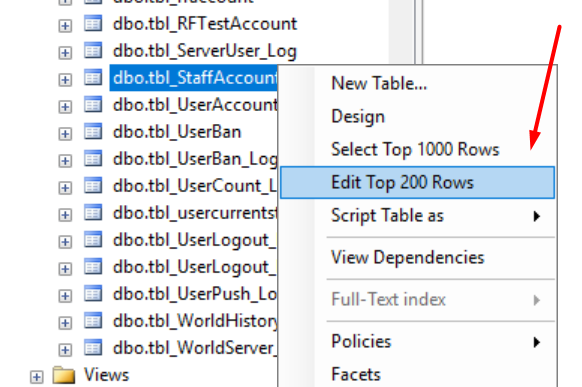
on ExpireDT column, edit your GM account expired date to as long as possible for example mine to 2029-05-22 18:49:54.593. This method will prevent your GameMaster ID from expired, and you can always log in.
Click "!" (Execute SQL) to save/run the query.
Edit C:\rf\server\account-login\RF_Bin\Initialize\Login_Filter_Dev.ini
Replace the contents with the files below, adding as many filters as needed. The first filter must start with zero. This example assumes your username is !test1 and that you will be connecting from your local computer IP public Address.
[IPAddress]
FilterNum = 0
Filter0 = 140.213.210.23
FilterRange0 = 255

[ID]
FilterNum = 1
Filter0 = !test1
Install Server
This guide will walk you through preparing the RF Online game server.
WARNING: This guide is for general development server configuration. This guide does not cover setting up a game server for a production purpose, and we do not recommend following this guide for that purpose.
Verify your files are extracted to C:\rf\server open directory \account-login\RF_Bin\Initialize and edit file AccountSystem.ini
Ensure file AccountSystem.ini like this :
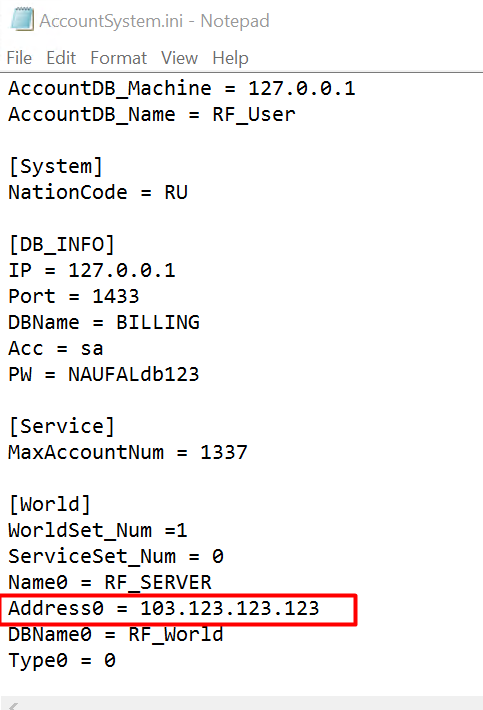
and edit \zoneserver\WorldInfo\WorldInfo.ini, replace GateIP with IPv4 public of your server.
[System]
WorldName = RF_SERVER

GateIP = 103.123.123.123
You are now ready to start your game servers. This is easily accomplished by the RFManager.exe application. Click the Start button to Login Server, Account Server, and Zone Server.
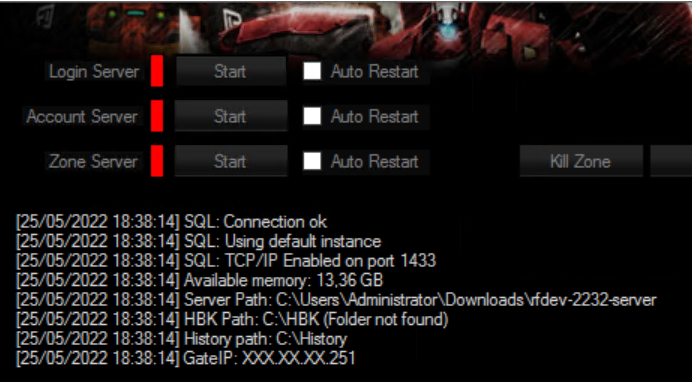
[25/05/2022 19:03:59] Started: LoginServerSD (1072)
[25/05/2022 19:04:03] Started: AccountServerSD (4868)
[25/05/2022 19:04:06] Started: ZoneServerUD_x64 (3416)
Firewall Server
In this section, you need to open some ports on your Windows Firewall to ensure local PC (RF client) can connect to your server.
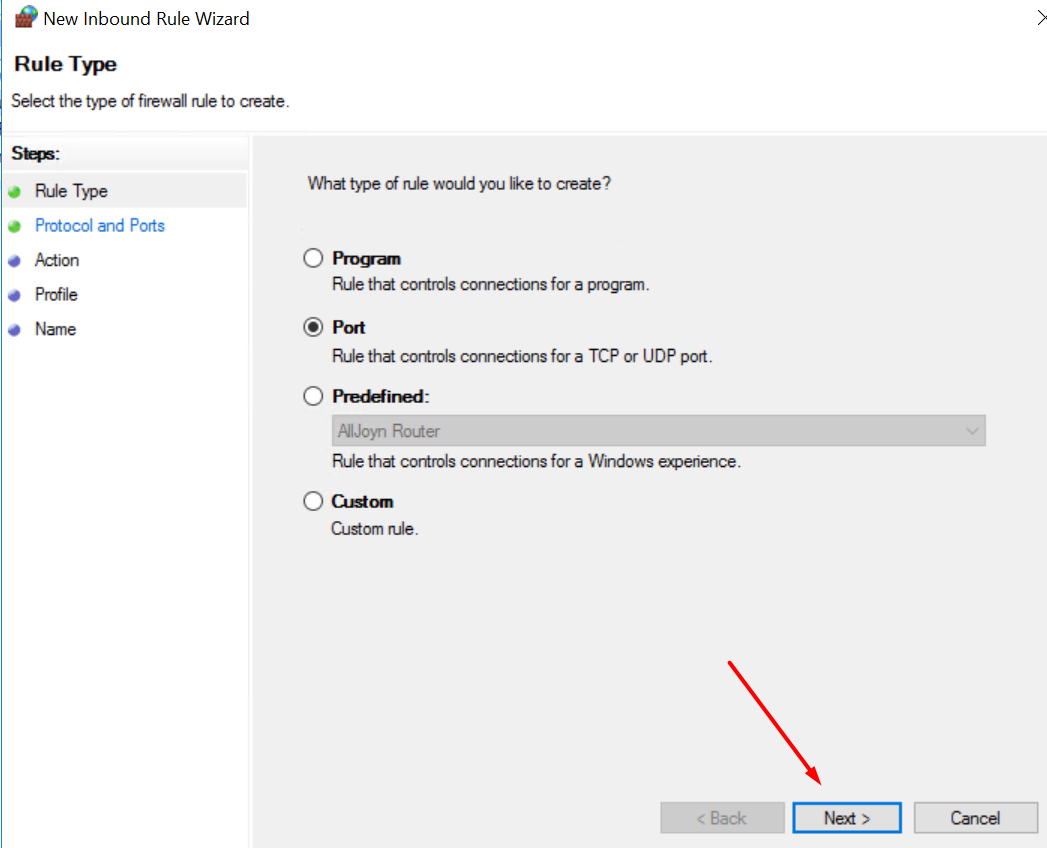
Open Windows Firewall with Advanced Security program, and click "Inbound Rules" and then click New Rules action.
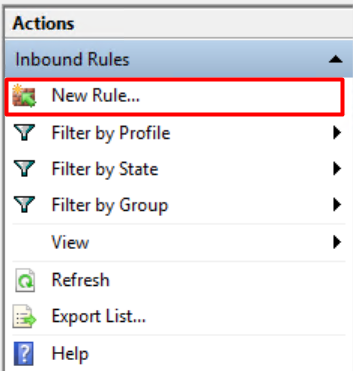
a New Inbound Rule Wizard opened, and then choose Port to open some port in your Windows server
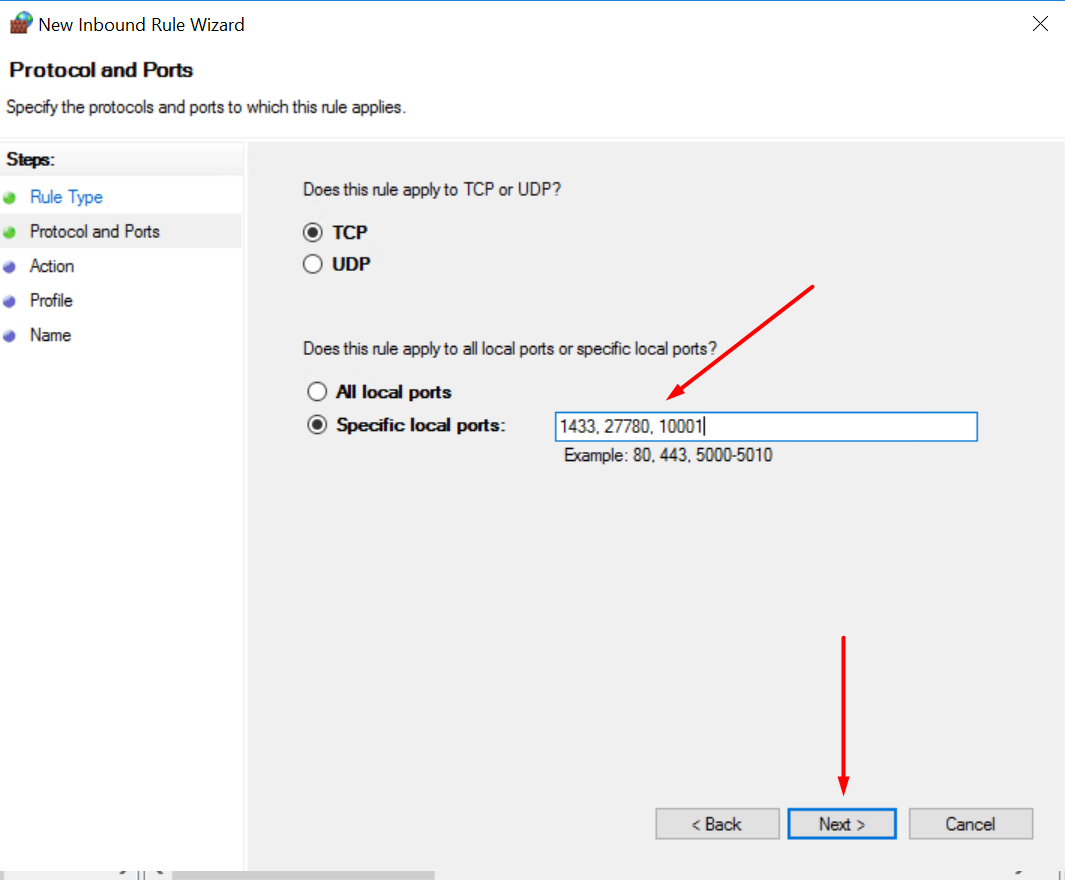
In protocol and Ports section, apply the TCP rule and specific local ports :
1433, 27780, 10001
In Action section, choose to Allow the connection to ensure that specific local ports are opened in your Windows Server Firewall, click Next.
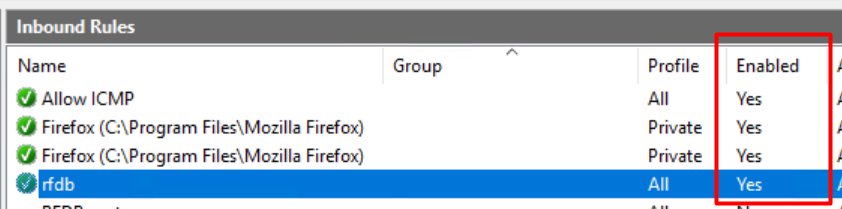
Check Domain, Private and Public to this rule, click Next and then pick a name for this example : rfdb
Make sure the new rule rfdb are enabled on your firewall.
Install Client
At this stage, your server is now running and you have game accounts created. It's time to log in!
Extract the client files rfdev-2232-client.7z to your local computer, open the folder (rfdev-2232-client), and edit RFLauncher.ini
[Server]
IP=103.123.123.123
Port=10001
Replace IP with IPv4 public of your server.
And you can now login to your server with your client, open RFLauncher.exe application, login with !test1 for gamemaster ID and click Launch to open the game.
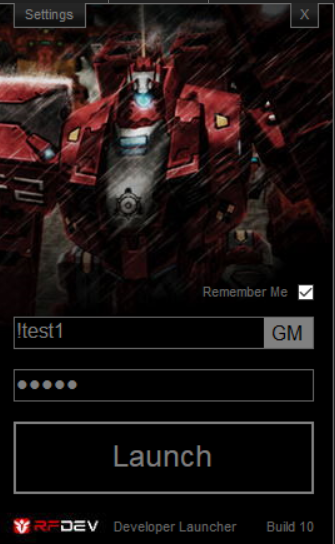
Success !! 🤩😎

Source :
- RF-DEV Starter Guide (and modified because for windows server)
- RF-DEV Discord
- and fellow RF Online sites/blog communities
Bonus clip from my gameplay as a character with nickname map Accretian on RF Online Remastered in 2020. Thank you for reading !